
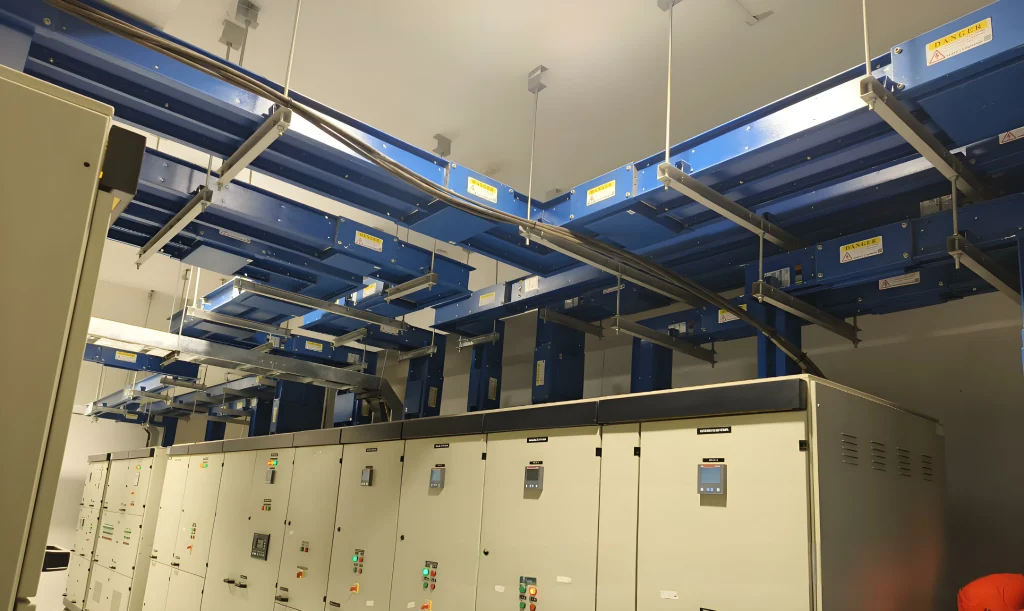
1.Busbar Trunking Systems: Installation Tips and Best Practices
Busbar Trunking Systems have become an essential solution for modern power distribution in commercial, industrial, and infrastructure projects. From copper busbar to aluminum busbar designs, these busbar products offer high efficiency, compact layouts, and flexible configurations for safe, reliable electricity delivery. However, busbar systems are only as good as their installation quality—incorrect alignment, inadequate fastening, or poor jointing can lead to serious safety hazards, performance issues, and costly rework.
Whether you’re sourcing from busbar manufacturing specialists, buying custom busbar assemblies, or working with insulated busbar solutions, understanding the best practices for busbar trunking installation is critical. This guide covers step-by-step installation tips, common mistakes to avoid, and safety considerations, ensuring your project benefits from a professional busbar trunking system installation service.
2.Why Proper Busbar Trunking Installation Matters
Unlike simple cable runs, electrical busbar trunking involves precision assembly of busbar components such as joints, expansion sections, bends, and tap-off units. Poor installation can result in:
1.Electrical faults due to misalignment or improper torque settings.
2.Overheating from loose connections or inadequate ventilation.
3.Mechanical instability from insufficient supports.
4.Reduced lifespan and higher maintenance costs.
Partnering with certified installers for busbar trunking systems near you ensures compliance with manufacturer guidelines, safety standards, and local regulations.
3.Step-by-Step: How to Install Busbar Trunking Systems Safely
1. Pre-Installation Planning
Before purchasing or installing, work with busbar trunking system suppliers offering installation guides to:
Review project drawings and load requirements.
Verify the busbar manufacturing specifications (copper vs. aluminum).
Plan routing, clearance, and support points.
Prepare tools such as torque wrenches, alignment jigs, and insulation testers.
Pro Tip: For existing buildings, assess space constraints and potential obstacles before committing to a layout.
2. Site Preparation
Ensure floors, walls, or ceilings are level and clean.
Mark installation lines using laser alignment tools.
Pre-install support brackets at calculated intervals according to manufacturer standards.
3. Assembly of Busbar Components
Start from the main electrical busbar feed point and work outward.
Align trunking sections precisely to avoid mechanical stress.
Install expansion joints where required to account for thermal movement.
4. Jointing and Torque Control
Follow manufacturer torque specifications exactly—over-tightening or under-tightening can damage insulation or create loose connections.
Use insulating barriers or shrouds for insulated busbar assemblies.
5. Testing Before Energizing
Perform insulation resistance tests.
Check torque on all connections.
Visually inspect for any damage or foreign objects.
4.Best Practices for Successful Busbar Trunking Installation
| Best Practice | Why It Matters |
| Use certified installers | Ensures compliance and warranty protection. |
| Follow manufacturer installation guides | Avoids configuration errors. |
| Maintain correct torque values | Prevents overheating and electrical faults. |
| Allow for thermal expansion | Avoids structural stress over time. |
| Keep clearances from combustible materials | Improves fire safety. |
5.Common Installation Mistakes to Avoid
1.Skipping alignment checks – Causes stress and misfit connections.
2.Mixing copper and aluminum without proper transition joints – Leads to galvanic corrosion.
3.Insufficient support spacing – Increases vibration and wear.
4.Ignoring torque guidelines – Risks overheating.
5.Improper sealing in outdoor installations – Allows moisture ingress.
6.Tools Required for Busbar Trunking Installation
1.Torque wrench with calibration certificate
2.Insulation resistance tester
3.Laser alignment tool
4.Bracket mounting hardware
5.Personal protective equipment (PPE)
7.Maintenance After Installation
Even with cost-effective busbar trunking installation solutions, ongoing maintenance is key:
1.Annual visual inspections for mechanical damage.
2.Torque rechecks after thermal cycles.
3.Cleaning dust and debris from ventilation paths.
8.Troubleshooting Installation Issues
1.Hotspots on thermal imaging → Re-torque or replace faulty joints.
2.Electrical noise/interference → Check for proper grounding.
3.Mechanical sagging → Add intermediate supports.
9.FAQs – Busbar Trunking Installation
1.How long does busbar trunking system installation take?
It depends on project size—small commercial setups may take 2–3 days, while large industrial runs can take weeks.
2.Can busbar trunking systems be installed in existing buildings?
Yes, but requires careful planning around structural constraints.
3.Are there certifications required for busbar trunking installers?
Yes, most manufacturers and local regulations require certified personnel for warranty validity.
4.What is the cost estimate for busbar trunking system installation?
Ranges from $50–$150 per meter depending on materials, complexity, and labor rates.
10.Why Choose Professional Installation?
Opting for turnkey busbar trunking system installation packages from experienced installers ensures:
1.Compliance with IEC/UL standards.
2.Reduced installation errors.
3.Long-term performance reliability.
4.Full warranty protection from the busbar trunking system suppliers.
This article was written by a senior electrical systems engineer at Welleshaft, with over 10 years of experience in busbar manufacturing, installation supervision, and power distribution quality control. Our team has delivered installation services for high-rise buildings, manufacturing plants, and data centers worldwide.